All the time, I have been trying to get rid of an attached HDD to my mac. Not only because it occupies one fourth of all my thunderbolt ports, but also it is quite annoying to plug and unplug it everytime. Hard drives become extremely fragile on Macs for any reason I don’t understand: an unexpected unplug will make it unrecognizable until my mac restarts. In years, I have been repeating the kinda hassle, specifically, issuing the command of ejecting, waiting for seconds, then being able to close the lid. Now, I am just tired of it, and I solved it by moving it to a RaspberryPi.
If you are not interested in the reasons, jump to the next next section directly. There are FAQs put at the bottom, so feel free to browse through.
Why this?
There are already plenty tutorials online about how they migrated the Time Machine onto their RaspberryPis, and I learnt from them too. However, I feel there are still plenty of unsolved problems and accidents happening which deserve some solutions.
Why RaspberryPi?
Cheap, if you have to ask, is my first reason. RaspberryPi runs as a small server at my home, and I can attach my already bought external hard drive to it. If I choose to go with an NAS, I’d have to buy internal hard drives for it, and I don’t want to spend the money.
Small is my second reason. For someone, like me, who resettles frequently, it is definitely not wise to buy a big NAS and move it around all the time.
Why not a router with USB ports and support Samba? Well, I had no previous experience playing with any routers, so I chose the one I deemed handleable. Since AirPort Time Capsule has been discontinued for so long, I just believe it would be easier to go with a Pi.
Actual tutorial starts here
To enable TimeMachien on your Pi, there are generally 3 steps: config the storage, prepare the Pi, and set up your Mac.
1 Config the storage
First of all, you need an external hard drive, or you can use your SD card for Pi if you have enough (≥ 100 GB) space (bad idea, don’t do it 🙃). Then you need to decide one thing, which is important:
Do I need a wired recovery or not?
Ask yourself this question, and also test your internet. Backing up over the internet is easy, even with a slow pace, since you can freely use your Mac for other things. However, slow recovery can be draconian, with a terrible internet connection and your Mac sit there silently showing the recovery will take 72 hours, you’d just wanna give up backup you have. So ask yourself again, do you fully trust your internet connection or not. If yes, jump to 1.1 if not, 1.2.
If you are having a doubt right now, it’s fine, we can switch it over anytime before you need to recover the backups. There is one more factor you need to consider: fully wireless option can be more stable than the other option, which I will explain at 1.3.
1.1 Internet only backup and recovery
You are confident with your internet condition, and you choose to do everything over the internet. Awesome, let’s prepare our hard drive then.
First all of, attach it to your Pi, and log into your Pi through ssh. Then we are going to format it to ext4, which is the natively supported file format for *nix like systems.
Warning: as we are reformatting the hard drive, everything on it will be lost. Make sure you back up the data before doing this.
First, we are going to locate the hard drive:
➜  ~ sudo blkid
[sudo] password for pi:
/dev/mmcblk0p1: LABEL_FATBOOT="boot" LABEL="boot" UUID="592B-C92C" TYPE="vfat" PARTUUID="5a11f676-01"
/dev/mmcblk0p2: LABEL="rootfs" UUID="706944a6-7d0f-4a45-9f8c-7fb07375e9f7" TYPE="ext4" PARTUUID="5a11f676-02"
/dev/sdf3: UUID="ad013eda-1715-36d9-9187-ca092848b9f8" LABEL="Seagate Backup" TYPE="hfsplus"
From the information above, we see the drive is at /dev/sdf3. Then we reformat it:
➜ ~ sudo mkfs -t ext4 /dev/sdf3
Once this is done, we just need to mount it somewhere
➜  ~ mkdir Backup
➜  ~ sudo mount /dev/sdf3 Backup
That is it, you can now jump to 1.3.
1.2 Support wired recovery
You are hesitate about your internet condition and whatever reasons, you’d like to keep the ability to recover from this hard drive after attaching it to your Mac. Awesome, let’s prepare our hard drive then.
First all of, attach it to your Pi, and log into your Pi through ssh. we are going to format it to unjournaled HFS+ which can be read by both Mac and *nix systems.
Warning: as we are reformatting the hard drive, everything on it will be lost. Make sure you back up the data before doing this.
First, we need to install some dependencies:
➜  ~ sudo apt-get update
➜  ~ sudo apt-get upgrade
➜  ~ sudo apt-get install hfsplus hfsutils hfsprogs
The packages are used to mount, fix, and format HFS+ format hard drives. You will use them in the future a lot.
Next, we locate our drive:
➜  ~ sudo blkid
[sudo] password for pi:
/dev/mmcblk0p1: LABEL_FATBOOT="boot" LABEL="boot" UUID="592B-C92C" TYPE="vfat" PARTUUID="5a11f676-01"
/dev/mmcblk0p2: LABEL="rootfs" UUID="706944a6-7d0f-4a45-9f8c-7fb07375e9f7" TYPE="ext4" PARTUUID="5a11f676-02"
/dev/sdf3: UUID="ad013eda-1715-36d9-9187-ca092848b9f8" LABEL="Seagate Backup" TYPE="hfsplus"
From the information above, we see the drive is at /dev/sdf3. Then we reformat it:
➜ ~ sudo mkfs.hfsplus /dev/sdf3
Once this is done, we just need to mount it somewhere
➜  ~ mkdir Backup
➜  ~ sudo mount -t hfsplus /dev/sdf3 Backup
That is it, you can now jump to 1.3.
1.3 Ext4 vs HFS+
OK, so we have made our choice over the condition I have given above. Let’s now discuss the pros and cons of both solutions:
| ext4 | HFS+ |
|---|---|
| Natively support | Fuse mount |
| More stable for writing data | Writing data may be corrupted |
| Cannot be read by Mac under recovery mode | Can be read by Mac under recovery mode |
Thus, if you chose ext4, your backup data is normally fine, and if your internet runs fast, you will have the best wireless Time Machine experience.
If you chose HFS+, you should regularly check if your backup is integrated, but you have one extra option to attach the hard drive to your Mac and recover from it directly without going through the internet.
The choice is yours, and you can always switch between them with the price of losing all previous backups.
2 Prepare the Pi
Once your hard drive is correctly format and mounted, we need to prepare the Pi to accept Time Machine backup requests. But before that, we need an extra user as the solely backup handler:
➜  ~ sudo adduser backup
➜  ~ sudo chown -R backup:backup Backup # change the owner of the drive
We are going to use Samba as the interaction protocol between Mac and Pi. You may find some tutorials using AFP or Netatalk, that because those are outdated tutorials. The AFP was just discontinued by Apple days ago.
➜ ~ sudo apt install samba
Edit the samba configuration file /etc/samba/smb.conf to add your mounted drive to the samba protocol. Add the following lines at the end of the file:
[timemachine]# this will be name appearing on your Mac
    comment = TimeMachine
    min protocol = SMB3 # Can be removed if your Mac or Pi doesn't support SMB3
    path = /home/pi/Backup # Change to the path to your Backup folder
    valid users = backup
    read only = no
    vfs objects = catia fruit streams_xattr
    fruit:time machine = yes
We are almost done here, just quickly add the backup user to the samba setup and reload the samba:
➜  ~ sudo smbpasswd -a backup
New SMB password:
Retype new SMB password:
➜  ~ sudo testparm -s
➜  ~ sudo service smbd reload
At this point, samba setup is finished. You can even try to connect to it on your mac.
But we have one more thing to do before finishing, we are going to set up an Avahi service, which disguises your Pi as a Time Capsule, which can be detected by your Mac automatically.
➜ ~ sudo apt install avahi-daemon
Then add the following content to /etc/avahi/services/samba.service, create the file if not exist
<?xml version="1.0" standalone='no'?><!--*-nxml-*-->
<!DOCTYPE service-group SYSTEM "avahi-service.dtd">
<service-group>
  <name replace-wildcards="yes">%h</name>
  <service>
    <type>_smb._tcp</type>
    <port>445</port>
  </service>
  <service>
    <type>_device-info._tcp</type>
    <port>9</port>
    <txt-record>model=TimeCapsule8,119</txt-record>
  </service>
  <service>
    <type>_adisk._tcp</type>
    <port>9</port>
    <txt-record>dk0=adVN=timemachine,adVF=0x82</txt-record>
    <txt-record>sys=adVF=0x100</txt-record>
  </service>
</service-group>
Remember to change the adVN=timemachine to match with the identifier you used in the smb.conf.
We are all done here folks! Hooray! Then we just need to set up on your mac.
3 Set up your Mac
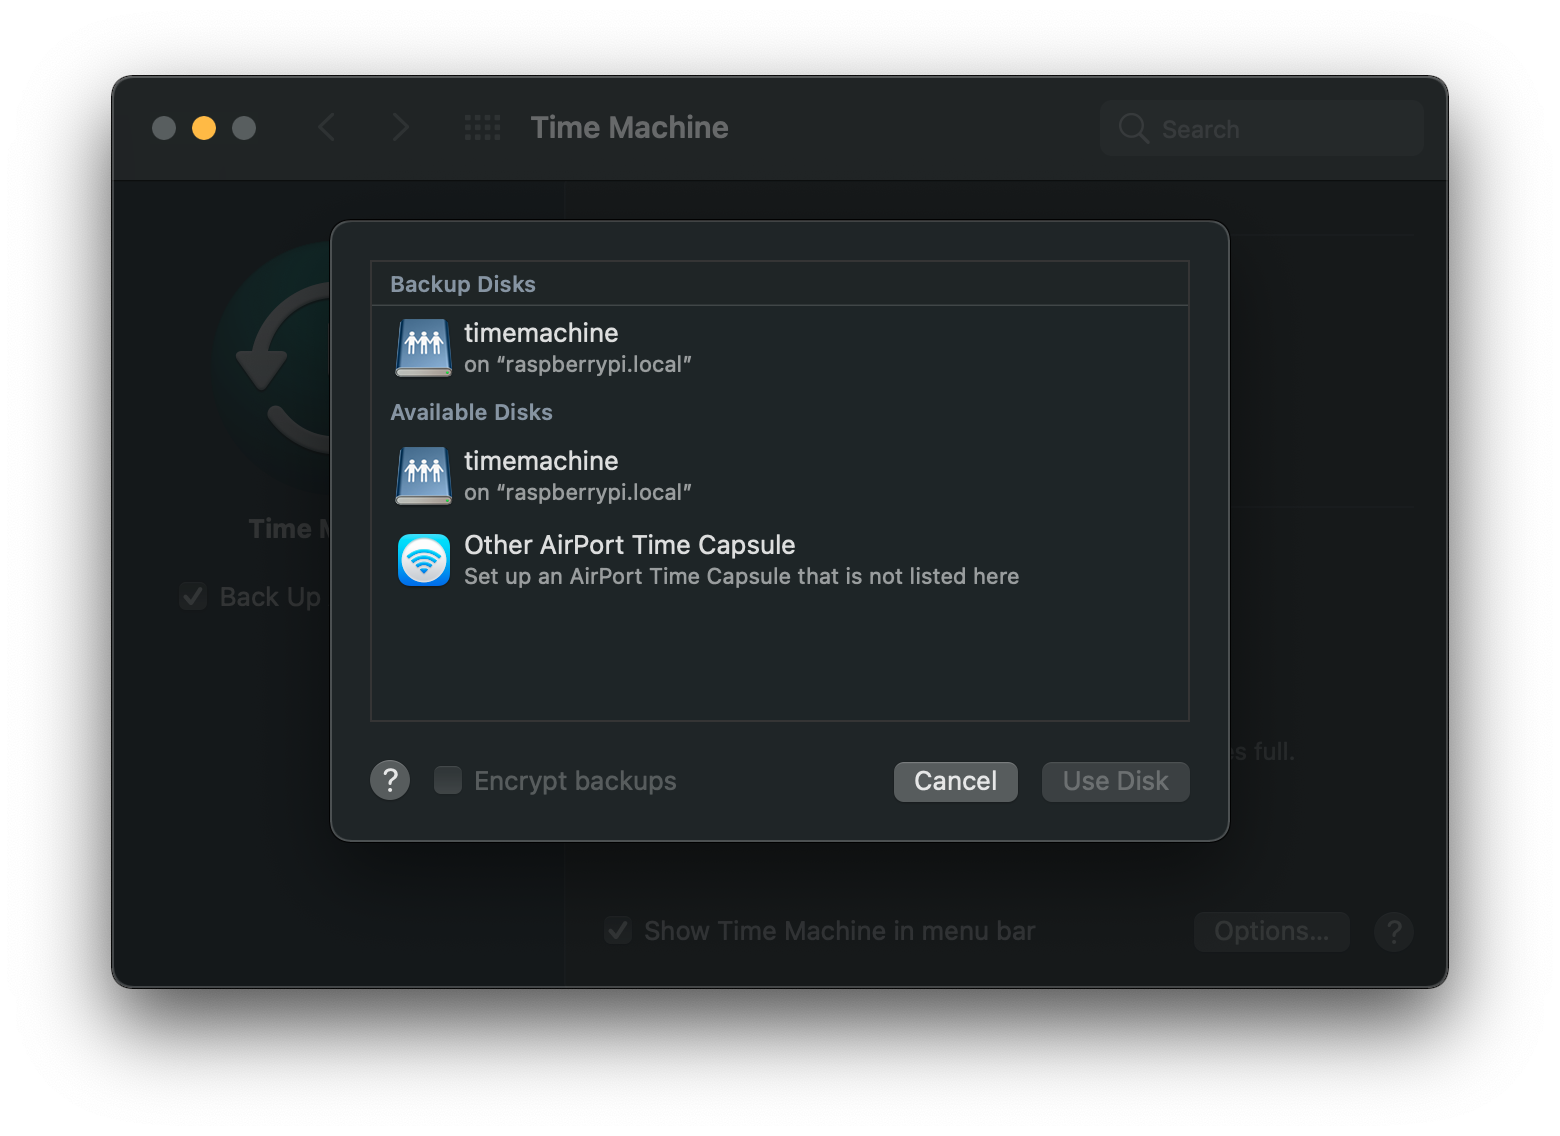
This is the easiest stage, and you just need to open up the Time Machine preference panel, and click Select Disk to select the disk you just set up.
You are now good to go! Enjoy a new life with wireless Time Machine.
FAQ
1. The first backup takes a long time, is it normal?
Yes, absolutely normal. The first backup usually takes hours depending on your network condition.
2. My backup is so slow even after the first backup, is it normal?
Depends on how you define slow, it can be normal. Time Machine is not simply uploading data to your external drive, so it may appear to be slow.
If you really doubt it, you can run a speed test on your Pi and see if everything is alright. I strongly suggest you connect your Pi using an ethernet cable.
3. How can I know my connection to Pi is through SMB3?
Here is what you want: How can I tell what version of SMB is negotiated when I connect to a share from macOS?
4. My HFS+ drive becomes read-only, anything wrong?
This would happen quite a lot actually.
First of all, check the permission using ls -l and see if you are the owner or if you have the write permission at all.
Then if it’s the issue with the mounting, try remounting it. Repairing the disk will be an option too, sudo fsck.hfsplus /dev/sdf1.
If non of them work (not likely), you probably need to backup the content and reformat the disk again 😔.
5. My Pi beeps and disconnects my drive, what can I do?
This happens if you have more than one external hard drive connecting to your Pi. It’s because the Pi only has a small voltage over it, and it cannot drive all the hard drives you attach to it. The beep is it warning you, some drives may be disconnected.
Giving the explanation above, you can choose either disconnecting some drives or using an USB hub with external power supplies. You can easily find a lot of them on Amazon, and I won’t post one here.